Monday, January 31

Guest Post: Sarah from Cotton Kiwi

Have you ever met someone online who just makes you want to hop on a plane and visit them in person?  That's my reaction to Sarah from Cotton Kiwi.  I can't tell you what it is... perhaps her sweetness, or her warmth, or her utter love for her daughters.  And she has been wonderfully gracious to guest post for me, despite a flooded basement (due to torrential rains and high tides in New Zealand).


RAPUNZEL BARETTE HOLDER TUTORIAL BY COTTON KIWI
I’ve been an avid follower of CJ’s blog, Pink Tea, since she started about a year ago. I’ve loved seeing her wonderful party ideas and the gorgeous felt food she makes for her children to play with and have tried out a couple of her tutorials with great success (including the beautiful ribbon corker barrettes). When she asked me to write a guest post, I jumped at the chance.

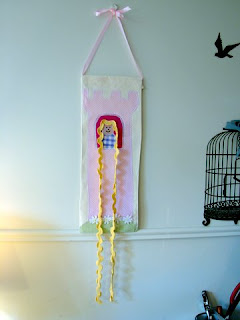
I live in Auckland, New Zealand and write a blog called ‘Cotton Kiwi’. I make mainly children’s clothes and toys (as well as Tape Measure Rose brooches for the grown- ups!) which I sell at the Devonport Craft Market (which I also organise) and in online shops. I have two beautiful little girls who inspire me in a lot of what I make. They both have ridiculous amounts of hair barrettes and I am constantly finding them around the house. I wanted to make them something that would encourage them to keep their hair accessories tidy and after a trip to see the Disney ‘Tangled’ movie, I knew what would work. So here’s my tutorial for a Rapunzel Barrette holder.


What you will need:
  • 2 pieces of plain, light coloured cotton measuring 20cm x 50cm.
  • Double sided fusible webbing.( I used HeatnBond Ultrahold but you can use any double sided fusible webbing.)
  • Fabric scraps for appliqué. I used green gingham for the hill, pale pink and white polka dots for the tower; dark pink for the window; flesh colour for the face and purple gingham for the dress. You can use what you like.
  • 1 piece stiff fusible interfacing (20cm x 50cm)
  • 1m of 1.5cm wide yellow ric-rac
  • Small piece of flower trim for base of castle (optional)
  • About 20cm of pink ribbon for hanger
  • Thin cardboard (e.g. cereal box) for templates
  • Pencil
  • Iron
  • Sewing machine
  • Paper scissors
  • Fabric scissors
  • Black fabric marker or permanent marker pen
How You Make It:
1. Cut out your background fabric.

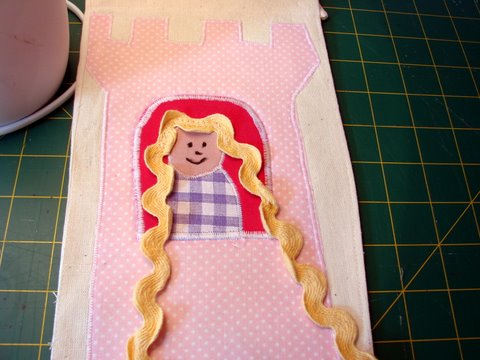
2. Using the photograph as a guide, draw a simple tower shape on thin cardboard and cut it out. Do the same for the window shape, the hill shape, the face and the dress. Put them all together on the background fabric to check that you like all the proportions. If not, adjust them until you are happy.

3. Draw around the templates on the paper side of the double sided fusible webbing. Roughly cut out the shapes from the fusible webbing (don’t cut them out properly yet). Fuse the webbing on to the wrong side of the corresponding fabric pieces (ie green for the hill) and then cut them out carefully.

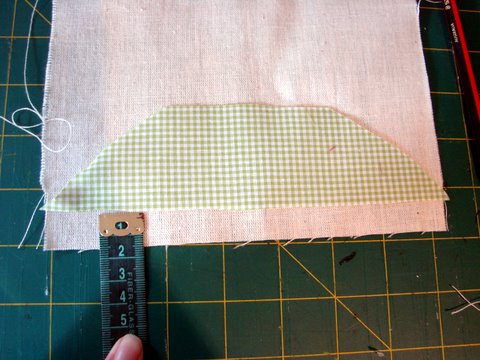
4. Measure 1.5cm from the bottom edge of the background fabric and make a light mark. Line up the hill piece and fuse it to the background piece.

5. Using the picture as a guideline, pop the castle tower in place next, followed by the window, then the dress and finally the head.

6. Once all your pieces are fused in place, you can stitch around them. I used white thread for my stitching but you could use any light colour. Don’t use black as it shows up every little mistake. Set your machine to a zig zag stitch with a stitch length of less than 1 and a zig zag width of around 2.5. Do a test on a scrap of fabric to check you are happy with your width and stitch length. Once you are happy, stitch around all the pieces, starting from the bottom, going all around the hill and along the bottom of the castle. Snip the thread and then starting at the bottom left of the castle, stitch all around the castle. Snip the thread again and stitch around the dress and around the bottom of the face. Stitch the rest of the face. Check that you have snipped off all threads on both the back and front of your piece and that everything looks tidy. Press your work. Set your machine to a straight stitch and stitch some flower trim to the base of the castle (I stitched mine top and bottom).


7. Iron the stiff interfacing to the wrong side of the front piece.

8. Pin the back piece right sides together with the front piece. Starting at the top, stitch around all sides, using a 1.5cm seam allowance and leaving a 3cm gap for turning at the top.

9. Clip all four corners and layer the seam (cut the interfaced seam allowance close to the stitching.) Turn right sides out, gently poke out corners using a chopstick or similar and press.

10. Fold down the top edge 3cm towards the back and press and pin in place. Top stitch close to the bottom of the folded piece, creating a channel and closing the turning gap at the same time.

11. Turn the piece so the front side is up. Starting just below the channel you created, top stitch around the other three sides. You are nearly finished!

12. Take your yellow ric-rac and fold over one end by 1.5cm. Fold it again and stitch it in place. Do the same with the other cut edge.

13. Fold the ric-rac in half to find the centre and pin it in place around the top of the head. Use a zig zag stitch to fix it in place in the middle of the top of the head and down the sides. Using a marker pen or fabric marker, draw Rapunzel’s face on.


14. Take the other piece of ribbon and thread it through your channel using a safety pin (I poked mine through with a pencil.) Tie a bow in the ribbon to create a hanger. Attach your barrettes and you are ready to go!

Do let me know if you make one of these. I’d love to see your version.

Sarah Bird, Cotton Kiwi, http://www.cottonkiwi.blogspot.com/ Pin It

Sunday, January 30

Recap from the Year: Theme Days

When I first came across Katherine Marie's Theme Weeks, I absolutely fell in love.  What a great idea for children.  I began trying my own humble attempts, often tied to books because I love children's literature.  Even though I'll be on hiatus from blogging, here are some of the theme days floating around in my head that I still want to do with my kids...
  • Corduroy Bear - Think buttons... button memory game, button crafts, edible buttons, preschool-level sewing
  • Pinkalicious - This one will probably become a tea party with some of my daughters friends, with those famous pink cupcakes of course
  • Very Fairy Princess - Edible fairy wands, building fairy villages in the backyard, pancakes with fairy dust, and dressing up like fairy princesses for the day
  • The Little Engine that Could - trains, trains, and more trains
And here are the recaps of the ones I did:


THEME OF THE DAY: MADELINE
This was by far my favorite theme day.  I love this classic story.
Book: Madeline, many from the series
Activity:
- Making our own Madeline hat from a paper plate and bowl
- Making French Flags from Red, White, and Blue candies
- "RED", "BLUE" and "YELLOW" spelling cards
- Madeline Coloring Pages
Food:
- A Croque en bouche of donut holes and blueberries (complete with Madeline on top)
- A French Flag Lunch
- Lemon Creme Madeline Hat Cookies
Read More...

 
THEME OF THE DAY:  FISH
Book:  Rainbow Fish and the Big Blue Whale by Marcus Pfister
Activity:  Playing at the Beach (we were on vacation)
Food:
- Goldfish for snacks (parmesan and honey since Mommy doesn't like the original)
- Fish in Water, aka Blue Jello with Honey Goldfish
- Grilled Cheese "Fish" with Blueberry "Bubbles"- Kites


THEME OF THE DAY:  PLANES
Book:  Pedro by Disney
Activity:
- Learning about the Wright Brothers (we were at Kitty Hawk at the time)
- Painting "Plane" Toast
- Flying Gliders on the Beach
Food:  Snack of Plane Toast and Cheese Clouds
Read More...


THEME OF THE DAY:  SNOW WHITE
This was really our celebration of Halloween.  The kids were Snow White and Dopey.
Book:  The classic Snow White fairy tale, though the Disney version, not Grimm Brothers (the kids aren't ready for the real version yet)
Activities:  Snow White and Dopey Costumes
Food:  An apple themed dinner, including apples, apple sausage, baked apples, and "apple" cupcakes
Read More...


THEME OF THE DAY:  KITES
Inspiration:  Mary Poppin's "Let's Go Fly a Kite" Song
Activities: 
- Making a Paper Kite
- Flying Kites on the Beach
- Dancing along the Beach singing "Let's Go Fly a Kite"


THEME OF THE DAY:  CANDY CORN
This theme was to celebrate National Candy Corn Day (October 30th).
- "Candy Corn" Pancakes
- "Candy Corn" Breakfast Parfaits (yogurt and bananas)
- "Candy Corn" Cheese platter
- "Candy Corn" Pudding Parfait
Read More...


THEME OF THE DAY:  WATERMELON


THEME OF THE DAY:  STRAWBERRIES
Felt Strawberries
- Strawberry Barrettes
- Strawberry Jam
- Rosemary and Strawberry Shortbread Cookies (not pictured)


Pin It

Wednesday, January 26

Recap from the Year: Felt Food

Here's a recap of my felt food obsession for the year (plus a few new things)...

2. Farfalle (new)
4. Raviolli with Basil Leaves (new)

1. Donut (tutorial) and Flour/Sugar Sack (tutorial)
2. Tea Party Kit with Sugar Cookies and Brownies (tutorial)
3. Valentine Cookies (tutorial)
4. Strawberries (tutorial)

1. Green Eggs and Ham (tutorial)
2. Fortune Cookies (new)
3. Pot stickers (new)
4. More Sugar Cookie Sprinkles... always fun

Pin It

Tuesday, January 25

Guest Post: Katie from MiaMoo Designs


For those who have not met the lovely Katie from Mia Moo Designs, I recommend a little tour of her site for her latest projects.  She has two of the loveliest girls who model her array of dresses, headbands, and lately, her new jewelry.  I have really enjoyed getting to know Katie over this past year and am so excited that she agreed to guest post this month.  So, without further adieu, let me introduce Katie and her adorable Valentine candy hearts.


Hi! I'm Katie from MiaMoo Designs. I am so excited and flattered that Miss CJ invited me to be a guest blogger of her FABULOUS blog. I have two beautiful little girls named Mia and Hayden. I started MiaMoo Designs when my Mia was 2. I LOVE all things crafty. I mostly make hair accessories, dresses/skirts for my girls, and chunky necklaces to go with their outfits. I've been lucky enough to have others like what I do, so I can make some money from home doing what I love :) I absolutely LOVE doing trades with people I've met through blogging, and I'm always up for a new project. I have some fun projects and tutorials to share with you today. Ok, let's get started! With Valentine's Day around the corner, I think these felt candy hearts are in order!


I made these little cuties last Valentine's Day, and boy were they a hit! I played around with the embroidery stitches to see which I liked best. The pink one is the blanket stitch, I did that one first, and decided it wasn't my fave for this project, so I just did the basic whip stitch and liked that better. At the time, I wasn't planning on doing a tutorial, so I don't have pictures of the process, but I'll do my best to explain how I made these. Here is what I used:


Supplies Needed:
1. Felt in whatever color you would like you candy hearts to be
2. Scissors
3. A dark pink fine tip Sharpie marker
4. Embroidery floss in the colors you are using for your candy hearts
5. Embroidery needle (I forgot to take a picture of that too)
6. Heart Stencil if you don't want to make your own (I got mine at WalMart)

How to:
I cut out all my heart shapes from your stencil. (2 per color because you will be embroidering both sides together)
When I was done cutting out my hearts, I tied a knot at one end of my embroidery floss and threaded it through my embroidery needle.

I placed the two hearts together and started my embroidery stitch at the top of the heart, in the middle. You will want to push the needle through the backside so your knot isn't on the front to start. From there I did a basic whip stitch all the way around the heart (ie:go up from the back with the needle, pull through, then go back up through the back again...make sense?) Once I got back to the top of the heart where I started, I tied a knot on the back. Lastly, I used my pink Sharpie to write on each heart. Taduhhhh!!! So easy and so cute! Hope you can understand my tutorial, I've never done one. if you have any questions feel free to comment and leave your email address :)

Another fun project for Valentine's Day is my Valentine Heart Applique T-Shirt

I bought a red t-shirt at Walmart (I think it was around $3.50) and cut out three hearts out of felt. 1 Large white, 1 Medium pink, and 1 small red heart. Next I hand embroidered little x's around the edges of the red heart onto the pink one. I thought it would be cute to give each heart a different stitch design, so on the pink heart I did a whip stitch and on the white one just a regular straight stitch along the edges. I think it's easier to embroider the hearts to each other first-THEN embroider the largest heart to the T-shirt. All you need for this cute little Valentine Shirt is a scrap of white, pink, and red felt, pink embroidery floss, an embroidery needle, and a t-shirt. So easy and so ADORABLE! This year I made my girls Valentine's necklaces and bracelets for Heart Day :)


I just LOVE chunky necklaces on little girls, don't you? The problem is they are hard to find. I googled them, looked on etsy, and couldn't find anything I liked, so I decided to make my own! I've been on a jewelry making kick lately and can't seem to stop making these chunky necklaces. I branched out and started making my own cupcake beads out of sculpey clay and baking it in my oven. Who doesn't love cupcakes? These cupcake necklaces look especially sweet on toddlers and little girls. I think Mia has one to go with just about any outfit. Here are a few examples of some other necklaces I've make recently. If you would like to order anything, just leave me a comment on my blog with your email address and I'll get back to you and will email you a paypal invoice :)


Thanks so much for joining me today! I have other tutorials and fun projects that can be found on my blog :) I think you all feel the same way I do about Pink Tea. I'm going to really miss all of CJ's creativity and blog posts of all the amazing things she comes up with!
Pin It

Recap from the Year: Parties

Here's a recap of parties from this past year...

Under the Sea and Turning 3:  My daughter's first birthday party with friends.  Given that she had boys and girls coming over, we did a gender-neutral orange and blue theme.  Water games in the backyard, fun favors, and delicious sweets made for a great day. Read more...


Redskins Tailgate: My son's first birthday party... a great day of family gathering to celebrate my little man.  Read more...

Books and Owls Baby Shower: My first party on the blog, a baby shower for a very special baby.  A green and brown party with owl and book details.  Read more...

 
Red, Hot, and Summer:  My casual birthday cook-out celebration, inspired by all things summer... picnics, sunflowers, bicycles, bright baloons, grilled burgers, and all things red and white.  Read more...


Pin It

Sunday, January 23

Every girl needs a good twirl


For calm days of photographing or busy days when you just need to leap and dance... this skirt is the skirt for you.

As you heard in recent posts, I received a sewing machine for Christmas.  Despite the craziness of life, I did manage to squeeze in a few projects... a kids tablecloth (so I could practice straight lines) and this twirly skirt.

Based off of Made's Circle Skirt Tutorial, it was my first foray into children's clothes, and my daughter is loving it.  If you haven't tried this tutorial, I highly recommend it.

Details on the wand are available in this old post.

Pin It
Related Posts with Thumbnails