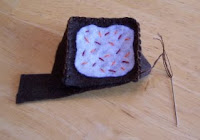
For those of you new to my blog, this is the tutorial for the brownies featured in the Tea Party gift set.
FELT BROWNIES
Supplies:
- Brown Felt
- Different Colored Felt for the Icing (In the original post, I showed this with pale pink felt. In this tutorial I will be using white because I am making a less girly version for a friend. However, I will call out the original colors in the instructions.)
- Brown embroidery floss matching the brown felt
- Embroidery Floss in 2 accent colors (These should stand out against the icing. I used dark pink and white in the original. Here I am using maroon and orange.)
- Scissors
- Cardstock to make a template
- Needle
- Pins
- Cotton Balls
- Make a template. Cut out one square of cardstock, 1 3/4" x 1 3/4". Then cut out a strip that is 5/8" x 7 1/2".
- Pin the square template to the brown felt. Cut out a square. Repeat. Next pin the long template to the brown felt and cut out the strip. Finally, cut out the icing piece free-hand from the white (pink) felt. This should be smaller than your square. At this point you should have four pieces: 2 brown squares, 1 brown strip, and 1 white (pink) piece.
- Place your white (pink) piece on top of the brown square. Using your orange (dark pink) embroidery floss, make big stitches like sprinkles, stitching the two pieces together as you go. Make sure you stitch near the edges as well.
- Repeat stitching "sprinkles" with your maroon (white) embroidery floss.
- Next, line your brownie top that you just stitched along the left top of the brown strip. The strip will be the sides of the brownie. Using your brown embroidery floss, stitch one edge of the top to the side piece using the blanket stitch. (Note on this picture... You should see the icing. I jumped from step 2 to step 5 without realizing it and had to go back and do steps 3 and 4. I forgot to retake the picture once the icing was attached. Whoops.)
- When you reach the corner, wrap the strip around and keep stitching. Repeat until you have stitched all four sides.
- Tuck the remaining flap inside. Cut the remaining piece at a diagonal from the bottom. Pulling the strip closed, stitch down the seam.
- Take the second brown square and line it up along the edge of the brownie. Stitch the side. Continue until three of the four sides are stitched together.
- Stuff the inside of the brownie with cotton. Make sure to fill it until its firm and hard to pull closed.
- Stitch the remaining side until the brownie is closed. Knot off your thread and you are done.
I hope you enjoy. And thank you for the encouragement to post these tutorials.


6 comments:
Oh My Gosh! you posted it. Thank you sooo much. I have to send you a pic of the stuff you taught me how to make. Thank you so much my niece will love these not sure how they will come out, will be sending you pics. You inspire me to be creative. These are little bit complicated they seem but will take the challenge. How can I ever thank you enough.
Huge Hugs,
Maria
Maria: I can't wait to see your pictures. Thank you so much for all your encouraging comments. Reading your note brought a smile to my face this morning. Thanks.
C.J.
Thanks for getting that up so quickly! I bought all the supplies last week, and will finish putting together the tea set on our trip. Thanks again for the inspirtation...keep it coming!
Julie
Julie: I am so glad that I got it posted before your trip. Safe travels to you and your family.
Just DARLING! I'm obsessed with felt food! I think I will make these for my daughter :)
miamoodesigns.blogspot.com
I am obsessed with felt food! I love this brownie and you explained much simpler than some do! Thanks for posting these beauties!
Post a Comment