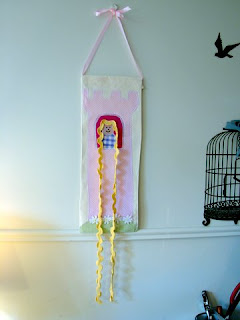


RAPUNZEL BARETTE HOLDER TUTORIAL BY COTTON KIWI
I’ve been an avid follower of CJ’s blog, Pink Tea, since she started about a year ago. I’ve loved seeing her wonderful party ideas and the gorgeous felt food she makes for her children to play with and have tried out a couple of her tutorials with great success (including the beautiful ribbon corker barrettes). When she asked me to write a guest post, I jumped at the chance.
I live in Auckland, New Zealand and write a blog called ‘Cotton Kiwi’. I make mainly children’s clothes and toys (as well as Tape Measure Rose brooches for the grown- ups!) which I sell at the Devonport Craft Market (which I also organise) and in online shops. I have two beautiful little girls who inspire me in a lot of what I make. They both have ridiculous amounts of hair barrettes and I am constantly finding them around the house. I wanted to make them something that would encourage them to keep their hair accessories tidy and after a trip to see the Disney ‘Tangled’ movie, I knew what would work. So here’s my tutorial for a Rapunzel Barrette holder.
What you will need:
- 2 pieces of plain, light coloured cotton measuring 20cm x 50cm.
- Double sided fusible webbing.( I used HeatnBond Ultrahold but you can use any double sided fusible webbing.)
- Fabric scraps for appliqué. I used green gingham for the hill, pale pink and white polka dots for the tower; dark pink for the window; flesh colour for the face and purple gingham for the dress. You can use what you like.
- 1 piece stiff fusible interfacing (20cm x 50cm)
- 1m of 1.5cm wide yellow ric-rac
- Small piece of flower trim for base of castle (optional)
- About 20cm of pink ribbon for hanger
- Thin cardboard (e.g. cereal box) for templates
- Pencil
- Iron
- Sewing machine
- Paper scissors
- Fabric scissors
- Black fabric marker or permanent marker pen
1. Cut out your background fabric.
2. Using the photograph as a guide, draw a simple tower shape on thin cardboard and cut it out. Do the same for the window shape, the hill shape, the face and the dress. Put them all together on the background fabric to check that you like all the proportions. If not, adjust them until you are happy.

3. Draw around the templates on the paper side of the double sided fusible webbing. Roughly cut out the shapes from the fusible webbing (don’t cut them out properly yet). Fuse the webbing on to the wrong side of the corresponding fabric pieces (ie green for the hill) and then cut them out carefully.
4. Measure 1.5cm from the bottom edge of the background fabric and make a light mark. Line up the hill piece and fuse it to the background piece.
6. Once all your pieces are fused in place, you can stitch around them. I used white thread for my stitching but you could use any light colour. Don’t use black as it shows up every little mistake. Set your machine to a zig zag stitch with a stitch length of less than 1 and a zig zag width of around 2.5. Do a test on a scrap of fabric to check you are happy with your width and stitch length. Once you are happy, stitch around all the pieces, starting from the bottom, going all around the hill and along the bottom of the castle. Snip the thread and then starting at the bottom left of the castle, stitch all around the castle. Snip the thread again and stitch around the dress and around the bottom of the face. Stitch the rest of the face. Check that you have snipped off all threads on both the back and front of your piece and that everything looks tidy. Press your work. Set your machine to a straight stitch and stitch some flower trim to the base of the castle (I stitched mine top and bottom).

7. Iron the stiff interfacing to the wrong side of the front piece.
8. Pin the back piece right sides together with the front piece. Starting at the top, stitch around all sides, using a 1.5cm seam allowance and leaving a 3cm gap for turning at the top.
9. Clip all four corners and layer the seam (cut the interfaced seam allowance close to the stitching.) Turn right sides out, gently poke out corners using a chopstick or similar and press.
10. Fold down the top edge 3cm towards the back and press and pin in place. Top stitch close to the bottom of the folded piece, creating a channel and closing the turning gap at the same time.
11. Turn the piece so the front side is up. Starting just below the channel you created, top stitch around the other three sides. You are nearly finished!
12. Take your yellow ric-rac and fold over one end by 1.5cm. Fold it again and stitch it in place. Do the same with the other cut edge.
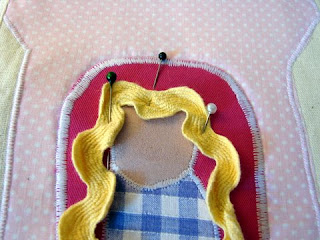
13. Fold the ric-rac in half to find the centre and pin it in place around the top of the head. Use a zig zag stitch to fix it in place in the middle of the top of the head and down the sides. Using a marker pen or fabric marker, draw Rapunzel’s face on.
14. Take the other piece of ribbon and thread it through your channel using a safety pin (I poked mine through with a pencil.) Tie a bow in the ribbon to create a hanger. Attach your barrettes and you are ready to go!
Do let me know if you make one of these. I’d love to see your version.
Sarah Bird, Cotton Kiwi, http://www.cottonkiwi.blogspot.com/ Pin It


187 comments:
Post a Comment