Showing posts with label Holiday Celebrations. Show all posts

Tuesday, November 23


Years ago I began to make these cornhusk flowers with the plan to create a wreath.  I ran out of time to make enough flowers for the whole wreath, and two children later, I haven't quite found time to finish it.  However, I still love pulling them out every year for Thanksgiving.

One day I will finish that wreath, perhaps when I replace my door and need something special to adorn it.

Want to create your own?  Directions are on Martha Stewart.  She has even more amazing cornhusk projects here.

Pin It

Monday, November 22

Gobble Gobble... a sweet memory

[ Disclaimer:  Please forgive the bad lighting.  The time change is resulting in nighttime photography.]


Want an easy Thanksgiving project?  Grab a dishtowel and fabric paint in your choice of colours.  Carefully apply fabric paint to your child's hands.  (Be very careful and close to a sink to wash up.  This is fabric paint after all.)  Once paint is applied, carefully press hand on cloth and allow to dry.  Repeat with other hand.

Once the handprint is dry, carefully paint feet, a beak, etc with a thin paintbrush.  Allow to dry.  Iron to set the paint.  And voila... a memento for years to come.


Pin It

Wednesday, April 7

Changing Traditions... the Bunny Cake

Here is my last belated Easter post.  I must confess that I created a scandal this year by breaking from tradition.  Every year we make a Bunny Cake for Easter.  My mother did this when I was younger and the tradition has carried forward, as so many do.  Here's a picture of last year's Bunny.


He's a tasty guy.  Yellow cake, fruit filling between layers, and a cool whip and coconut exterior.  No special mold is used.  He's assembled from two 9-inch cake rounds.  He's a cutie.  (And yes, my mother is creative)

But as I mentioned, I decided to change things up this year.  I've never been great at doing a tradition the same way every year.  I like variety.  (This probably drives my husband crazy since he loves traditions.)  However, there were other reasons for shaking things up besides just my enjoyment of doing new things.  This year's Easter lunch was a smaller gathering than past years.  And since I am still working on losing the baby weight, having a partially eaten cake around the house will not help me.  As it is we have plenty of Easter candy.  But what about little miniature cakes... little cakes that could be shared with others after Easter.  Still with a bunny theme, of course.  Hmmm.  That might work.

Thus was born... Bunny Cupcakes.


These little guys are lemon cake with cream cheese frosting.  The nose and eyes are those little melt-away mints.  The ears are marshmallows with pink sprinkles.

To accompany the bunnies, I made some cupcakes to be grass with a few Easter eggs (jelly beans).  Unfortunately, I learned a lesson here.  I was short on time and bought the frosting from the store.  There were only two cream cheese frosting cans left, and they were whipped.  I grabbed them anyways.  Lesson learned... the frosting was not stiff enough to hold a real form.  My "grass" became textured rather than having real points.  However, they were still delicious.  And my co-workers did help finish off the left-overs Monday morning.


We'll see what we do next year.  Perhaps we'll return to the traditional bunny cake.  Or perhaps we will make a new tradition.


Home is...
Pin It

Monday, April 5

Baby Taggie and Easter Baskets

I was really pushing it this year in terms of getting the Easter baskets ready for the kids.  I am not sure where the time went.  However, everything came together and we had a beautiful Easter celebrating the resurrection and enjoying beautiful time outside with family.  He is risen... he is risen indeed.

So even though Easter is over, I wanted to share with you the final craft item for the easter baskets that I didn't get made in time to post before Sunday... a teether toy for my son.  I admit that crafts for my daughter tend to dominate this blog, something I hope to fix as my son gets older.  But even though he is only 6 months, I wanted to put something special together for him as well.  And in keeping with the nautical theme that dominates his life (his easter outfit had anchors and sailboats as well), that means a stuffed blue whale.


I added some grosgrain ribbon tags for him to play with and chew on.  It didn't turn out perfectly, but not bad for my first stuffed toy.  The front didn't quite get the straight line I wanted.


His Easter basket ended up being a little tupperware container (to be reused for felt food storage in his sister's room), three cute blue and brown bibs (which we desperately needed), and the little whale taggie.  Not much, but he is only 6 months old.


And just to share, here's the final product for my daughter.  (We re-used last year's Easter Basket from her Nana.)  Content include:  felt flour and sugar bags to pretend to cook, 4 felt donuts, 2 wooden eggs (michaels) for her play kitchen, Benjamin Bunny book (Target dollar section), white satin slippers (Target dollar section), and a little white and pink purse (Target dollar section).  No candy here.  There was enough of that in the plastic eggs for her Easter Egg hunt.


And a belated Happy Easter to everyone.


Pin It

Saturday, April 3

Pysanky... grown-up egg dying

Last night was a special treat.  After dinner out with friends, I had a chance to enjoy a little grow-up egg decorating... Pysanky.  My first experience with Pysanky was when I attended the Russian Summer Governor's School program in highschool.  My language skills stunk.  I really cannot speak Russian... too many consonants for me.  However, I loved getting to decorate eggs with wax and make intricate designs.  Unfortunately, I forgot to pack my egg way back then when my parents came to pick me up.  In my memories, the egg was gorgeous.  Aren't memories great like that.

Anyways, my friend got into Pysanky last year.  But having learned our lesson last year regarding doing the eggs with my toddler in the house (hers are teenagers and didn't seem to have the same need to always be with and on mommy at all times), we sent the men to my house to put the kids to bed and then went to her house for fun.

I wish I had remembered my camera to show you the process and to show off her eggs.  Her skills are by far superior.  Her eggs have that traditional intricate detailing.  Mine, on the other hand, are a little more contemporary, largely because I have trouble doing straight lines.  I think I missed that day of kindergarten.


I apparently had an Under the Sea type of thing going...


If you want to learn more or try it yourself, she gets her supplies from here.  They have great tutorials for the designs.  Once I have more space for crafts (and fewer toddler hands), I have to order a kit.  Until then, it will remain a special treat.  And honestly, that doesn't sound too bad.  Plus, I'm enjoying the toddler hands.

Happy Easter to you.

Pin It

Thursday, April 1

Maundy Thursday and Cake Pops

I've mentioned before the number of babies in my life right now.  Baby showers rule the day.  And I am so excited for everyone.  However, I am especially excited for the opportunity to throw one soon because it also means that I will be an Aunt.  One of our brothers and his wife are preparing to adopt a baby.  I cannot wait.  I am SO excited.  This has been a long journey, but an exciting one.

With that said, my brain has been full of ideas for the shower, many of which you will see over the next few weeks.  As I was researching ideas, I fell in love with Bakerella's cake pops.  If you haven't seen them, you need to check her site out.  Just prepare to leave hungry.  I am trying to be realistic about how much I can tackle for this shower, so I wanted to do a dry run first.  And since I also wanted to do something sweet for my kids' teachers, it seemed like a great opportunity to combine the two.


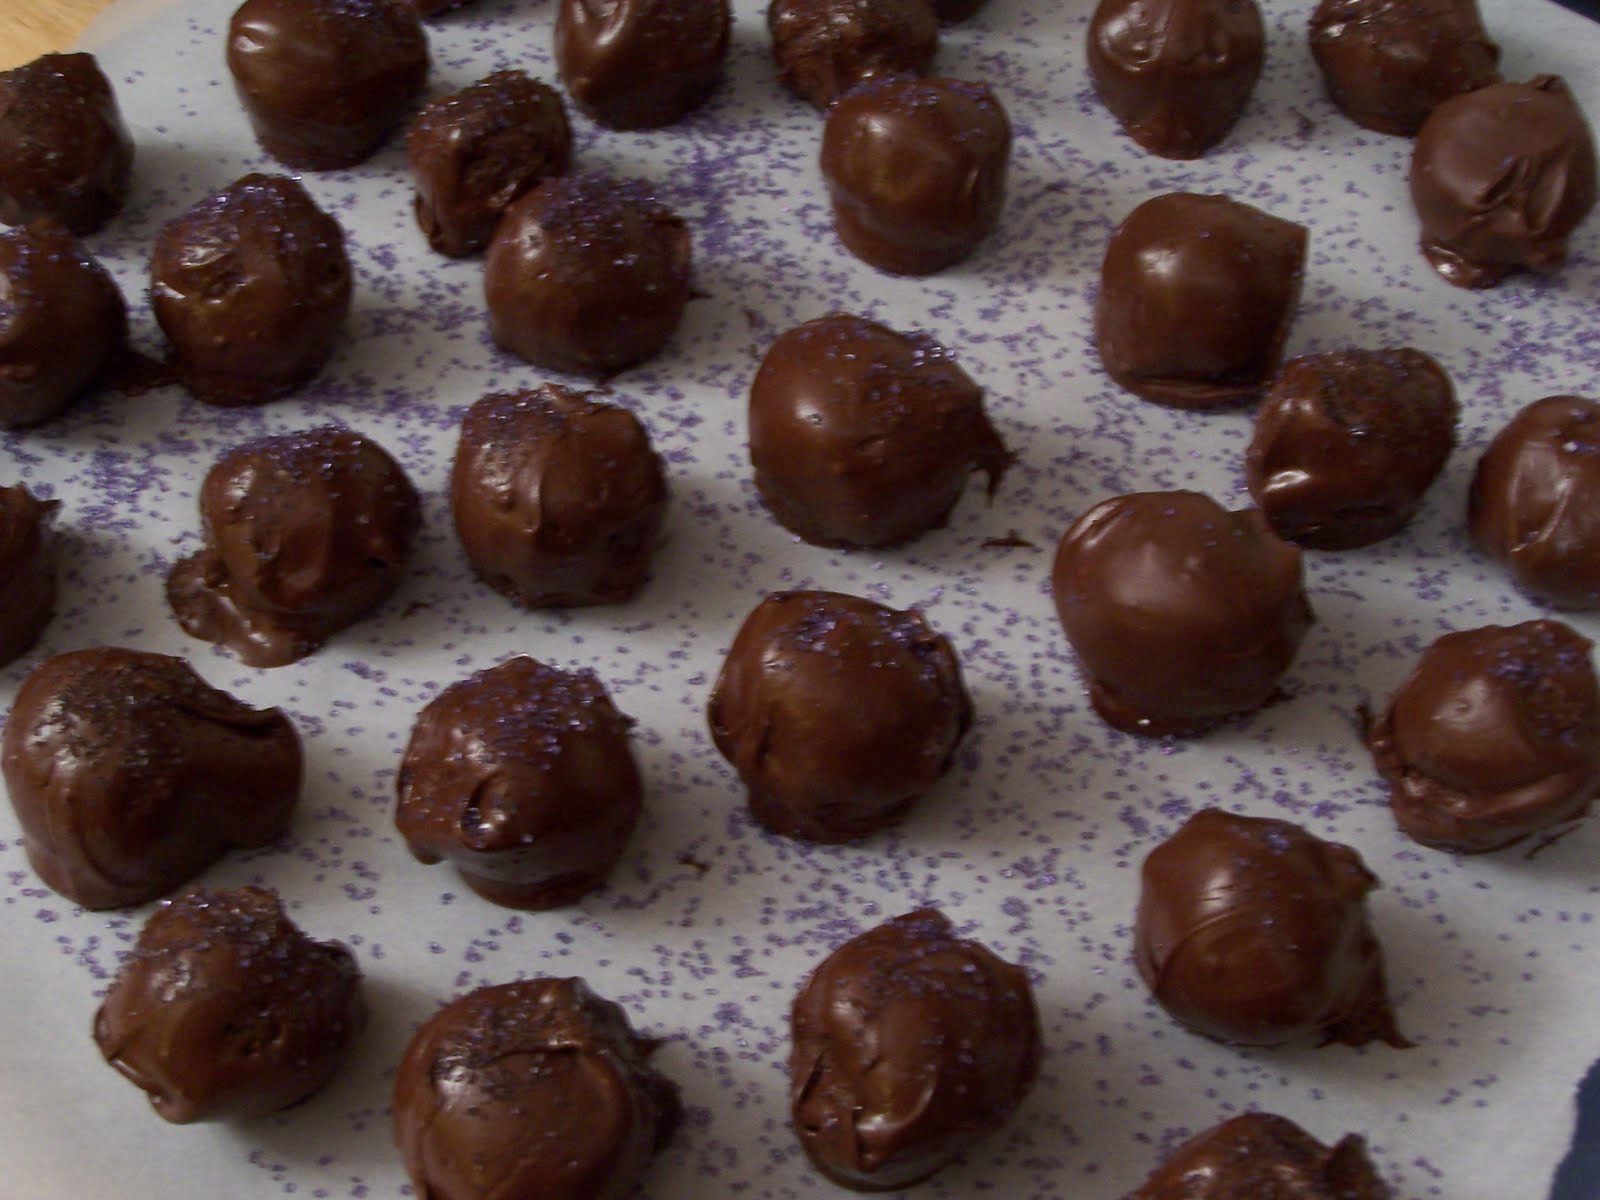
Cake balls... the balls were easy.  However, I wasn't as good at dipping them in chocolate.  Mine are chocolate cake and cream cheese icing dipped in semi-sweet chocolate.  I then added a few sprinkles to help hide any imperfections... err, I mean to be festive.  And if my co-workers are any indication, they are delicious.  They have thoroughly enjoyed eating the ones I brought into the office.


For the teachers, I packaged the balls up in bags and made a little Easter label for them.  I end up making about 10-11 packages for daycare to cover their teachers and the front staff whom I adore.


Delicious.  I want to try them with the red velvet cake mix.  I'm not sure if they will be made for the shower.  It depends on if I have enough time.  But I will definitely be making them again.

Let me know if you try them.  And if you have tips for dipping them in chocolate, let me know.  As you can see in the pictures, mine are a little messy.

Happy Maundy Thursday...
Pin It

Wednesday, March 24

Donuts, donuts, and more donuts

I can't believe that Easter is coming up so quickly.  I am definitely running behind in getting together goodies for the kids.  I decided this year that I wanted to make some homemade items for them, and you are welcome to come along on the ride.

I've already shared with you my obsession with Felt Food.  I am fighting the desire to make more cookies, though little spring sugar cookies would have been so cute.  Instead, I decided to tackle donuts.  I am a Dunkin' Donuts girl.  Thankfully, they aren't convenient to get to from our house so donuts are only an occasional treat (meaning we are in that part of town).  Now, though, we will have these calorie free alternatives to play with.

I wanted to make a diverse collection.  After all, who picks just one kind of donut?  You need the variety to keep things interesting.  That and I just like so many different types. 


For Easter, my daughter will be getting...
  • two donuts with chocolate icing and pink and green sprinkles (because pink and green matches her room)
  • one boston cream donuts (Mommy's favorite)
  • one chocolate glazed donut
  • and maybe a few more if I end up with some spare time before Easter
These are easy to make and easy to customize.
Pin It

Wednesday, March 17

Irish Eyes are Smiling

I love Google's artwork.  And today's just made me smile.  I think it is the celtic knots.  I'm a sucker for celtic knots.
Source:  Google on 17 March 2010

May your day be full of joys that bring smiles to your face.

Pin It

Tuesday, March 16

Taste of the Irish

A happy St. Patrick's Day to you!  I whipped up these cookies as a thank you to my children's teachers... and as a yummy treat for my family.


Obviously, I still need to work on my icing technique.  But I think I did better on these than on the Red Fish Blue Fish cookies.


To package them, I just put a cookie in each bag and stapled them with a little tag that said "I am LUCKY that you are my teacher."


So, may you have a tasty St Patrick's Day!


giveaways
Pin It

Tuesday, March 9

Wearing of the Green


Now you know that I couldn't let St. Patrick's Day pass without making another set of barrettes.  After all, she needs barrettes to match her Celtic shirt.  At least that is what I keep telling myself.

The basics are the same as for the original felt barrette tutorial I posted.  I used two shades of green felt.  The darker is the base of the barrette as well as the middle flower.  The lighter green was used for the two outside flowers.  I used two white buttons for the outside flowers and then used a lighter green button for the center flower.


This post is linked with:

giveaways
Pin It

Sunday, March 7

Dia Libh...

I am in love with freezer paper stenciling.  I may be getting a little obsessive.  My husband is afraid that I am going to stencil every article of clothing in the house.  Well, maybe it isn't that bad.  But I am having fun with it.  I can't wait to show you some of the spring creations I made for my little girl.  However, in honor of St. Patrick's Day, let me start with the Irish shirts I made for the kids.

I already had a green shirt lying around for my son.  Since it was a little boring, I thought I'd have some fun and dress it up.  We really enjoy going to Celtic festivals (much harder these days than during our pre-kid days), so I thought I would go more Irish-themed so they could wear them beyond St. Patrick's Day.


If you want to try this yourself, Dana from Made has a great tutorial on Freezer Paper Stenciling.

I chose the Irish Gaelic phrase "Dia Libh" meaning "God with You."  The font for the green shirt is Livingstone (downloaded from dafont.com).  I used Sherwood (also downloaded from dafont.com) for the white shirt.  I printed out the two phrases and then traced them onto the freezer paper.  After cutting the design out with an exacto knife, I ironed the design onto the shirt and painted it using Tulip's Glacier White Matte soft fabric paint.  I think I did 2-3 coats.


I did the same thing on the white shirt but used Tulip's Holiday Green Matte.  I made my daughter's shirt gender neutral so that her brother can wear it in a couple of years.  The girly shirts will be coming soon. 

Until then... dia libh.


This project is linked with:
giveaways
Pin It

Thursday, March 4

Seuss Extravaganza: Cat in the Hat Pin

I had originally planned on yesterday being the last Seuss post.  However, I couldn't resist making a little Cat in the Hat pin for my daughter.  Her daycare has been celebrating Dr Seuss this week as well, so I wanted her to have something special to wear.


The pin was really simple to make.  I whipped it up while watching an episode of BBC's Robin Hood (current obsession) with my husband once the kids were in bed.  There is something so relaxing about sewing in the evening.  It is such a nice relief to let go of all the day's stress and just create with your hands.  Pair that with british accents, a hot cup of tea, and my loving husband, and it is a perfect end to the day.


Making the pin was simple.  All I did was cut a hat shape out of the white felt.  I then cut out a piece of blue felt slightly larger than the white one.  I stitched a safety pin to the blue felt.  Then I stitched the white hat form to the blue felt using white embroidery floss.  I cut out three stripes from the red felt and stitched those on top.  And with that, it was done.

I hope you enjoy!

Pin It

Wednesday, March 3

Seuss Extravaganza: Red Fish Blue Fish

Despite the title, today is actually inspired by Green Eggs and Ham... by the idea of trying something new.  I love looking at decorated sugar cookies.  They are beautiful.  But I have never tried the pipe and flood method.  So, I have tried something new.  They aren't perfect.  But I'll share the results anyways as my confession for trying new things.

The plan was to make Red Fish and Blue Fish.  But, they came out more as pink fish, blue fish.  My daughter still likes them though.  Isn't it great that our children love what we make even when they don't meet our own standards.


I definitely need to keep practicing.  My poor family.  What will they do with all those practice cookies?

There's my confession.  Here's to trying new things... whatever the outcome.

Pin It

Tuesday, March 2

Seuss Extravaganza: Green Eggs and Ham

I do not like them, Sam-I-am.
I do not like green eggs and ham.
Excerpt from "Green Eggs and Ham" by Dr Seuss

I'm actually planning on giving these to my daughter for St. Patrick's Day, but I couldn't let this Seuss celebration pass without posting here.  After all, "Green Eggs and Ham" is a classic.


This is really simple if you want to make your own.  Unfortunately, I forgot to take pictures of the process.  The steps are pretty easy though.  This could be a great gift for a child to accompany a copy of the book.  Hmm... future birthday party gifts.
Pin It

Monday, March 1

Seuss Extravaganza: Painting Stars

Now, the Star-Belly Sneetches
Had bellies with stars.
The Plain-Belly Sneetches
Had none upon thars.
Excerpt from "the sneetches" by Dr. Seuss

We are still in our celebration of Seuss.  My daughter loves the "Belly Stars" story, otherwise known as "the sneetches."  So, I couldn't pass up incorporating stars into our celebration.  When I saw this post on Ohdeedoh, it seemed like the perfect project.


I cut stars out of bread slices using a star cookie cutter.  Then I made "paint" by coloring milk red, green, and blue.  Add some basting brushes, and that's all you need for a fun morning with a 2 1/2 year old.  My daughter loved it.  We toasted them up in the oven after we were done painting and they became her favorite snack for the day.


Have a lovely day, whether or not you have stars upon yars.

Pin It

Sunday, February 28

Seuss Extravaganza: One Fish Two Fish Onesie

My daughter has recently developed an affinity for Dr. Seuss.  Now that she knows all the Eric Carle books by heart and "reads" (i.e. quotes from memory) them to us, we are moving on to the next series.  We have spent a number of evenings reading "Green Eggs" (Green Eggs and Ham), "Belly Stars" (The Sneetches), "Turtle" (Yeurtle the Turtle), and "Hatching Egg" (Horton Hatches the Egg).  When I found out that Dr. Seuss's birthday is coming up on Tuesday (March 2nd), it seemed like fun to do some special activities to celebrate.

So let's start with the clothes.  After all, we need special costumes to celebrate.  That and I have just started playing with Freezer Paper Stenciling and wanted to try it out.  Thus was born the One Fish Two Fish onesie for my son.


In fairness, this isn't truly Seuss.  I took the opening line "One fish, two fish, red fish, blue fish" as my inspiration, but the final product is slightly more sophisticated.  The one thing I would change would be to have the "two fish" line higher.  The gap between the two lines is a little much.


My daughter helped cut out the letter stencils with my paper punches. It was a great activity to work on letters and spelling words. I found the fish silhouettes on-line.

I had planned on making a sneetch shirt for my daughter.  It was going to say "Stars on Thars" (don't you love that phrase) and have a green star on the belly.  However, I couldn't quite get the design to materialize in my head the way I wanted.  I'm going to do some other non-Seuss shirt designs for her.  However, I did make her these whimsical, primary-colored barrettes.  I can't decide how I feel about them, but I'll try them out for now.

I'll be posting more Seuss-inspired projects over the next couple of days.  Until then, we'll be reading Green Eggs and Ham over and over.  It was my favorite as a child, and I love watching my daughter laugh as we read it now.

I do not like green eggs and ham.
I do not like them, Sam-I-Am.


This Post is Linked to:
Pin It
Related Posts with Thumbnails